
Welcome to Day 09 of #The12DaysOfSwiftmas
Today’s prompt…
Swiftmas 2023 GitHub repo: https://github.com/thecodingsprite/Swiftmas-2023/tree/main
With this prompt I wanted to make something a bit more fun & game like. So I thought why not make a Christmas food shop into a game to create the shopping list!
Again I will begin this as a simple single file of code…but if you follow me all the way we will tidy our code & place our second view into another view file to keep things clean. So to begin with I made a list of foods to pitch against each other for the user to choose between. – The add both & skip buttons were an after thought. After I made a rather festive list (at least in the UK) I went searching for clip art examples on Canva for the button labels I was intending to use.
The images are named as such that they are in a sequence of a 10 round game but the first number is for which button it will be used with. So 1-1 is going to be shown in the first button & will be the first image. 2-5 is going to be the second button but on round 5 of picking if that makes sense. Anyhow after the images are imported into Xcode we can layout that basic UI.
For my logic I wanted 3 different @State properties. One for keeping a track what round we are on so we will know when to end the game & show the shopping list, one to track & update the 1st button label & the last one for the second button label.
@State var currentImage1 = 1
@State var currentImage2 = 1
@State var roundCount = 1
Next we need to create a list of the foods that will be going into the shopping list at the end. After some trial and error separating the foods into two different arrays seems to be the easiest way.
var food1 = ["Wine", "Crisps", "Pate","Brussels Sprouts", "Roast Potatoes", " Beef Joint", "Pigs in Blankets", "Lobster", "Ice Cream", "Fruit"]

var food2 = ["Fizzy Drinks", "Chocolate", "Prawns", "Broccoli", "Mashed Potatoes", "Turkey", "Yorkshire Puddings", "Crab", "Christmas Pudding", "Box of Chocolates"]
We will also need an empty array for us to create our shopping list as the user selects an item.
@State var shoppingList: [String] = []Now for the UI Layout, as I say we will be refactoring as we go but for now we know we want two buttons that change the state properties so we can continue onto the next round but that also add the selected item to the shopping list.
var body: some View {
if roundCount != 10 {
HStack {
// Image 01
Button {
// Next image
currentImage1 += 1
// Add this food to the shopping list
shoppingList.append(food1[roundCount - 1])
// Update currentImage2 to match the next round
currentImage2 += 1
// Update which round we are on
roundCount += 1
} label: {
Image("image1-\(currentImage1)")
.resizable()
.aspectRatio(contentMode: .fit)
.frame(width: 100)
}
// Image 02
Button {
// Next image
currentImage2 += 1
// Add this food to the shopping list
shoppingList.append(food2[roundCount - 1])
// Update currentImage1 to match the next round
currentImage1 += 1
// Update which round we are on
roundCount += 1
} label: {
Image("image2-\(currentImage1)")
.resizable()
.aspectRatio(contentMode: .fit)
.frame(width: 100)
}
}
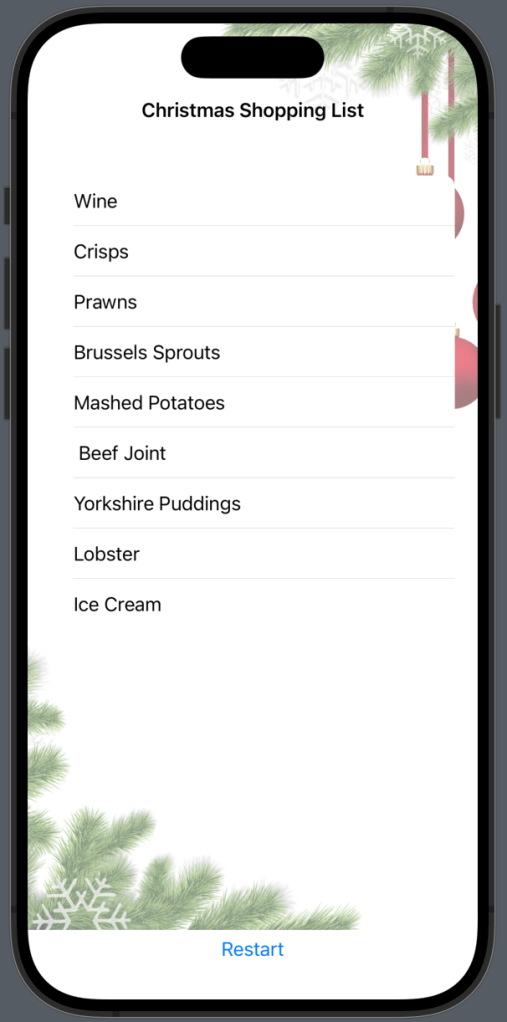
}Now we want to start creating the shopping list view. I wanted to use a List for the styling & again we can pass in the created shopping list into the ForEach so each item is displayed.
 // When series ends - display shopping list
        if roundCount == 10 {
            NavigationStack {
                List {
                    ForEach(shoppingList, id: \.self) { food in
                        Text(food)
                    }
                }
                .navigationTitle("Christmas Shopping List")
                .navigationBarTitleDisplayMode(.inline)
                .background(Image("bg")
                    .resizable()
                    .aspectRatio(contentMode: .fill)
                    .ignoresSafeArea()
                    .opacity(0.5))
                .scrollContentBackground(.hidden)
            }
        }
    }
At this point I wanted to begin the refactoring process & update that UI for a nicer design. So I embedded the body after the first if statement in a ZStack to create a nice background at all times.
 if roundCount != 10 {
            ZStack {...}
}
I also added some instruction text for the user so they know what to do.
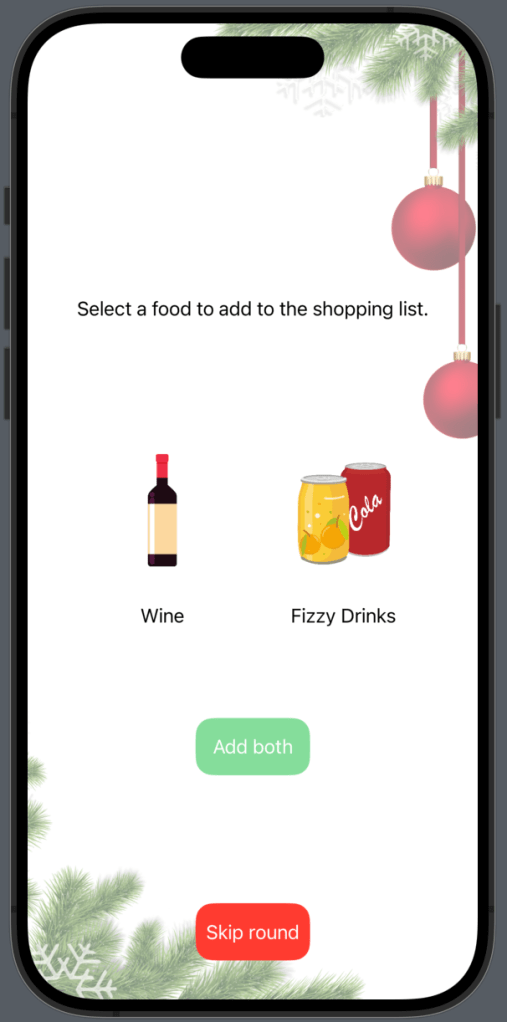
ZStack {

                // Background
                Image("bg")
                    .resizable()
                    .aspectRatio(contentMode: .fill)
                    .ignoresSafeArea()
                    .opacity(0.5)

                VStack {
                    Spacer()
                    Text("Select a food to add to the shopping list.")
                        .padding(.bottom, 200)
                    Spacer()
                    Spacer()
                }
                    // Image 01
                    HStack {...}
Next I wanted to quickly add a restart button to the list view. This way the user can restart the game if they changed their mind.
 // When series ends - display shopping list
        if roundCount == 10 {
            NavigationStack {
                VStack {
                    List {
                        ForEach(shoppingList, id: \.self) { food in
                            Text(food)
                        }
                    }
                    .navigationTitle("Christmas Shopping List")
                    .navigationBarTitleDisplayMode(.inline)
                    .background(Image("bg")
                        .resizable()
                        .aspectRatio(contentMode: .fill)
                        .ignoresSafeArea()
                        .opacity(0.5))
                    .scrollContentBackground(.hidden)

                    Button {
                        // Restart
                        roundCount = 1
                        currentImage1 = 1
                        currentImage2 = 1
                    } label: {
                        Text("Restart")
                    }
                }
At this point the game is pretty functional. I did think about tidying things up with an Image extension but with the second view planned to be outsourced to a new view file that only leaves a couple of images. So I left it as it is for this challenge as I think it will do as it is.
Additional Features
Now whilst the app is working, let’s face it some extra functionality would be nice. My main thought was a skip button to skip the round. Another suggestion from a friend was an add both button. I thought that was actually a really good idea, so lets implement them both & move that second view into it’s own separate file.
First up the buttons, lets add our @State properties for these buttons to watch out for when they are pressed.
 @State var isSkipped = false
 @State var wantsBoth = false
Next the actual buttons & styling. Place this VStack after the HStack with the game buttons.
ZStack {

                // Background
                Image("bg")
                    .resizable()
                    .aspectRatio(contentMode: .fill)
                    .ignoresSafeArea()
                    .opacity(0.5)

                VStack {...}

                HStack {...}


                VStack {

                    Spacer()
                    Spacer()
                    Spacer()
                    Spacer()

                        // Select both
                        Button {
                            // Add both items to list
                            shoppingList.append(food1[roundCount - 1])
                            shoppingList.append(food2[roundCount - 1])

                            // Next images
                            currentImage1 += 1
                            currentImage2 += 1

                            // Update which round we are on
                            roundCount += 1
                        } label: {
                            ZStack {

                                RoundedRectangle(cornerRadius: 15)
                                    .foregroundStyle(.green)
                                    .opacity(0.6)
                                    .frame(width: 100, height: 50)

                                Text("Add both")
                                    .foregroundStyle(.white)
                            }
                        }
                        .padding(.top, 100)


                    Spacer()

                    // Skip this round
                    Button {

                        // Next images
                        currentImage1 += 1
                        currentImage2 += 1

                        // Update which round we are on
                        roundCount += 1

                    } label: {
                        ZStack {
                            RoundedRectangle(cornerRadius: 15)
                                .foregroundStyle(.red)
                                .frame(width: 100, height: 50)
                            Text("Skip round")
                                .foregroundStyle(.white)
                        }
                    }
                }
Now lets move our second view into a new view file by right-clicking in the file navigator (left side of screen where your contentView file is) > New File > SwiftUI View – you can name this whatever you would like to name your structure. I went with ShoppingListView. Then cut and paste your shopping list view into the body. Now this is going to throw a load of errors, so if you follow my fixed code below you can begin hooking up the two files to pass through the data.
import SwiftUI

struct ShoppingList: View {

    @Binding var currentImage1: Int
    @Binding var currentImage2: Int
    @Binding var roundCount: Int

    // This passes the shoppingList variable for our List
    @Binding var shoppingList: [String]

    // We will be creating this function in the contentView, this closure allows us to use the function in this second view.
    var restart: () -> Void

    var body: some View {
        NavigationStack {
            VStack {
                List {
                    ForEach(shoppingList, id: \.self) { food in
                        Text(food)
                    }
                }
                .navigationTitle("Christmas Shopping List")
                .navigationBarTitleDisplayMode(.inline)
                .background(Image("bg")
                    .resizable()
                    .aspectRatio(contentMode: .fill)
                    .ignoresSafeArea()
                    .opacity(0.5))
                .scrollContentBackground(.hidden)

                Button {
                    // Restart
                    self.restart()

                } label: {
                    Text("Restart")
                }
            }
        }
    }
}
Now to go back to contentView & fix all the errors here. This isn’t too hard. First we write that restart function. (This goes after the end of the body but still inside the contentView struct)
func restart() {

        roundCount = 1
        currentImage1 = 1
        currentImage2 = 1
    }
Now when we call the ShoppingListView we can pass this function through as that weird looking closure we fixed up first.
 // When series ends - display shopping list
        if roundCount == 10 {
            ShoppingList(currentImage1: $currentImage1, currentImage2: $currentImage2, roundCount: $roundCount, shoppingList: $shoppingList, restart: {self.restart()})

        }
With that you should have no errors & everything should be working fine. What would you add to your Christmas shopping list?
The complete functional code is at the bottom of this post.
Our Completed Application
See you tomorrow for Day 10
Complete Code
ContentView
import SwiftUI

struct ContentView: View {

    @State var currentImage1 = 1
    @State var currentImage2 = 1
    @State var roundCount = 1

    @State var isSkipped = false
    @State var wantsBoth = false

    var food1 = ["Wine", "Crisps", "Pate","Brussels Sprouts", "Roast Potatoes", " Beef Joint", "Pigs in Blankets", "Lobster", "Ice Cream", "Fruit"]

    var food2 = ["Fizzy Drinks", "Chocolate", "Prawns", "Broccoli", "Mashed Potatoes", "Turkey", "Yorkshire Puddings", "Crab", "Christmas Pudding", "Box of Chocolates"]

    @State var shoppingList: [String] = []

    var body: some View {

        if roundCount != 10 {
            ZStack {

                // Background
                Image("bg")
                    .resizable()
                    .aspectRatio(contentMode: .fill)
                    .ignoresSafeArea()
                    .opacity(0.5)

                VStack {
                    Spacer()
                    Text("Select a food to add to the shopping list.")
                        .padding(.bottom, 200)
                    Spacer()
                    Spacer()
                }

                    HStack {
                        // Image 01
                        Button {
                            // Next image
                            currentImage1 += 1

                            // Add this food to the shopping list
                            shoppingList.append(food1[roundCount - 1])


                            // Update currentImage2 to match the next round
                            currentImage2 += 1

                            // Update which round we are on
                            roundCount += 1

                        } label: {
                            VStack {

                                Image("image1-\(currentImage1)")
                                    .resizable()
                                    .aspectRatio(contentMode: .fit)
                                .frame(width: 150)

                                Text(food1[roundCount - 1])
                                    .foregroundStyle(.black)
                            }
                        }

                        // Image 02
                        Button {
                            // Next image
                            currentImage2 += 1

                            // Add this food to the shopping list
                            shoppingList.append(food2[roundCount - 1])

                            // Update currentImage1 to match the next round
                            currentImage1 += 1

                            // Update which round we are on
                            roundCount += 1
                        } label: {
                            VStack {

                                Image("image2-\(currentImage1)")
                                    .resizable()
                                    .aspectRatio(contentMode: .fit)
                                .frame(width: 150)

                                Text(food2[roundCount - 1])
                                    .foregroundStyle(.black)
                            }
                        }
                    }

                VStack {

                    Spacer()
                    Spacer()
                    Spacer()
                    Spacer()

                        // Select both
                        Button {
                            // Add both items to list
                            shoppingList.append(food1[roundCount - 1])
                            shoppingList.append(food2[roundCount - 1])

                            // Next images
                            currentImage1 += 1
                            currentImage2 += 1

                            // Update which round we are on
                            roundCount += 1
                        } label: {
                            ZStack {

                                RoundedRectangle(cornerRadius: 15)
                                    .foregroundStyle(.green)
                                    .opacity(0.6)
                                    .frame(width: 100, height: 50)

                                Text("Add both")
                                    .foregroundStyle(.white)
                            }
                        }
                        .padding(.top, 100)


                    Spacer()

                    // Skip this round
                    Button {

                        // Next images
                        currentImage1 += 1
                        currentImage2 += 1

                        // Update which round we are on
                        roundCount += 1

                    } label: {
                        ZStack {
                            RoundedRectangle(cornerRadius: 15)
                                .foregroundStyle(.red)
                                .frame(width: 100, height: 50)
                            Text("Skip round")
                                .foregroundStyle(.white)
                        }
                    }
                }

            }
        }

        // When series ends - display shopping list
        if roundCount == 10 {
            ShoppingList(currentImage1: $currentImage1, currentImage2: $currentImage2, roundCount: $roundCount, shoppingList: $shoppingList, restart: {self.restart()})

        }
    }
    func restart() {

        roundCount = 1
        currentImage1 = 1
        currentImage2 = 1
    }
}

#Preview {
    ContentView()
}
ShoppingListView
import SwiftUI

struct ShoppingList: View {

    @Binding var currentImage1: Int
    @Binding var currentImage2: Int
    @Binding var roundCount: Int

    @Binding var shoppingList: [String]

    var restart: () -> Void

    var body: some View {
        NavigationStack {
            VStack {
                List {
                    ForEach(shoppingList, id: \.self) { food in
                        Text(food)
                    }
                }
                .navigationTitle("Christmas Shopping List")
                .navigationBarTitleDisplayMode(.inline)
                .background(Image("bg")
                    .resizable()
                    .aspectRatio(contentMode: .fill)
                    .ignoresSafeArea()
                    .opacity(0.5))
                .scrollContentBackground(.hidden)

                Button {
                    // Restart
                    self.restart()

                } label: {
                    Text("Restart")
                }
            }
        }
    }
}
