Happy Swiftmas Start Day!

For the first prompt, we have Wishlist. What will you create?
Are you ready to spread holiday cheer with a simple, fun, and functional app? In this tutorial, we’ll build a Wishlist Tracker using SwiftUI. This app will allow users to add items to a wishlist, mark them as purchased, and enjoy festive styling along the way.
By the end, you’ll have a fully functional app with:
- A sleek interface to add wishlist items.
- A dynamically updating list with purchase tracking.
- Festive touches like color-coded rows and a background image.
Let’s dive in!
Getting Started
1. Set Up Your Project
You can find the sample project in the GitHub repository here
Create a new SwiftUI project in Xcode:
- Open Xcode and select Create a new project.
- Choose the App template, click Next.
- Enter your project name (e.g., “WishlistApp”), set the interface to SwiftUI, and click Create.
Step 1: Define the Data Model
To manage wishlist items, we’ll create a simple data model:
struct WishlistItem: Identifiable {
    let id = UUID() // Unique ID for each item
    var name: String // Name of the item
    var isPurchased: Bool // Whether the item is purchased
}
This struct conforms to the Identifiable protocol, making it easy to use in SwiftUI’s lists.
Step 2: Build the User Interface
Adding the Wishlist Input
Now let’s build the main screen. Start by adding the following components:
- A
TextFieldto enter new item names. - A stylish “Add” button to add the item to the list.
Here’s how we’ll do it:
HStack {
    TextField("New Item", text: $newItemName)
        .textFieldStyle(RoundedBorderTextFieldStyle())

    Button {
        if !newItemName.isEmpty {
            items.append(WishlistItem(name: newItemName, isPurchased: false))
            newItemName = "" // Clear the input
        }
    } label: {
        ZStack {
            RoundedRectangle(cornerRadius: 8)
                .fill(.red) // Button background
                .frame(width: 50, height: 40)

            Text("Add")
                .foregroundStyle(.white) // Button text color
        }
    }
}
.padding()
.background(
    RoundedRectangle(cornerRadius: 10)
        .fill(.black)
        .opacity(0.2) // Subtle background for the input area
)
.shadow(radius: 10)
Displaying the Wishlist
We’ll use SwiftUI’s List to display all the wishlist items. Each row will have:
- The item’s name.
- A button to toggle its purchase status.
- A color-coded background to indicate whether it’s been purchased.
Here’s the code:
List {
    ForEach(items) { item in
        HStack {
            Text(item.name)

            Spacer()

            Button(item.isPurchased ? "✅" : "Mark as Purchased") {
                if let index = items.firstIndex(where: { $0.id == item.id }) {
                    items[index].isPurchased.toggle()
                }
            }
        }
        .listRowBackground(item.isPurchased ? Color.green : Color.white)
    }
}
.scrollIndicators(.hidden)
.scrollContentBackground(.hidden)
Adding Some Festive Flair
Let’s add a background image for some holiday spirit. Modify the VStack to include a background like this:
.background(Image("paper-bg"))Replace "paper-bg" with the name of an image asset you’ve added to your project. You can find this exact asset on pixabay or in the sample project.
Step 3: Assembling the Full View
Here’s the complete code for the main view:
import SwiftUI

struct WishlistItem: Identifiable {
    let id = UUID()
    var name: String
    var isPurchased: Bool
}

struct ContentView: View {
    @State private var items: [WishlistItem] = []
    @State private var newItemName = ""

    var body: some View {
        NavigationView {
            VStack {
                // Input Area
                HStack {
                    TextField("New Item", text: $newItemName)
                        .textFieldStyle(RoundedBorderTextFieldStyle())
                    Button {
                        if !newItemName.isEmpty {
                            items.append(WishlistItem(name: newItemName, isPurchased: false))
                            newItemName = ""
                        }
                    } label: {
                        ZStack {
                            RoundedRectangle(cornerRadius: 8)
                                .fill(.red)
                                .frame(width: 50, height: 40)

                            Text("Add")
                                .foregroundStyle(.white)
                        }
                    }
                }
                .padding()
                .background(
                    RoundedRectangle(cornerRadius: 10)
                        .fill(.black)
                        .opacity(0.2)
                )
                .shadow(radius: 10)

                // Wishlist Display
                List {
                    ForEach(items) { item in
                        HStack {
                            Text(item.name)
                            Spacer()
                            Button(item.isPurchased ? "✅" : "Mark as Purchased") {
                                if let index = items.firstIndex(where: { $0.id == item.id }) {
                                    items[index].isPurchased.toggle()
                                }
                            }
                        }
                        .listRowBackground(item.isPurchased ? Color.green : Color.white)
                    }
                }
                .scrollIndicators(.hidden)
                .scrollContentBackground(.hidden)
            }
            .navigationTitle("Wishlist")
            .background(Image("paper-bg"))
        }
    }
}
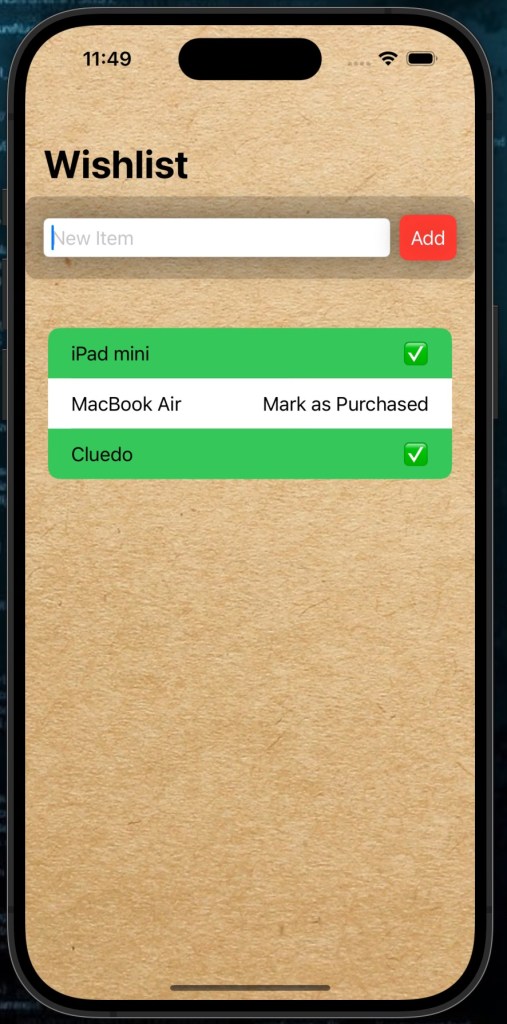
Step 4: Run Your App
- Add a background image to your project assets.
- Run your app in the simulator or on a device.
- Start adding items to your wishlist and watch as they update in real time!
What’s Next?
You can expand this app with features like:
- Categories: Group wishlist items (e.g., “For Me,” “For Family”).
- Database: Save the wishlist using
SwiftDataor Core Data. - Sharing: Allow users to share their wishlist via email or text.
This project is a fantastic way to learn SwiftUI while creating something useful and festive. Happy coding! See you tomorrow.🎄
