Who else loves Christmas Cards!

For the Second prompt, we have Cards. What will you create?
I’m looking forward to seeing what you come up with today.
Let’s make a Greeting Card Creator App
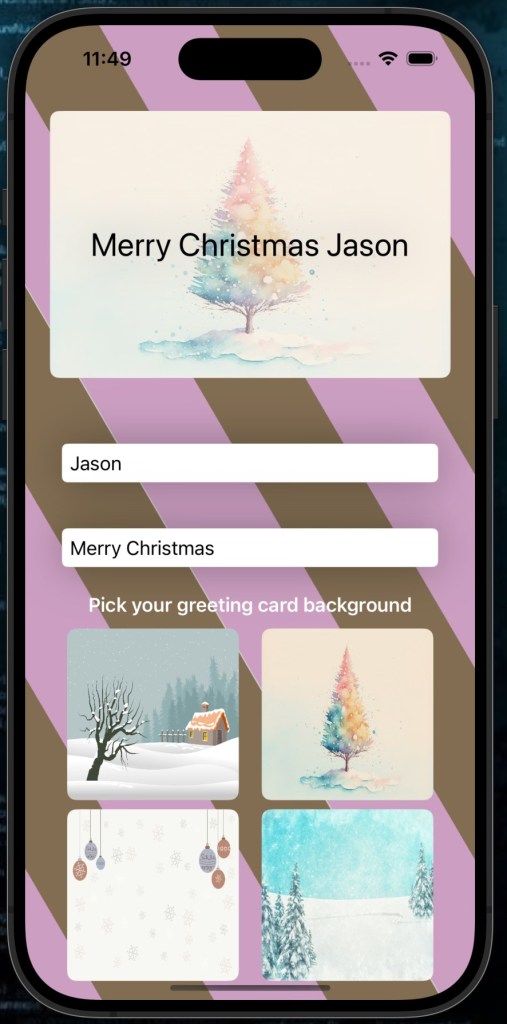
In this tutorial, we’ll build a Greeting Card Creator app using SwiftUI. The app allows users to personalize a digital greeting card by:
- Adding the recipient’s name and a custom message.
- Selecting from multiple festive card backgrounds.
- Displaying the final card with a polished and cheerful UI.
Let’s bring this idea to life!
Getting Started
1. Create a New SwiftUI Project
You can find the sample project in the GitHub repository here
- Open Xcode and create a new project using the App template.
- Name the project (e.g., “GreetingCardApp”), and ensure the interface is set to SwiftUI.
- Click Create to initialize the project.
For ease of finding all the image I have used, I’m placing all the pixabay links below & of course they will be included in the sample project. The background I personally made in Affinity Designer & can be download just below too.
Card Background 1 – Card Background 2 – Card Background 3 – Card Background 4
Step 1: Building the Greeting Card View
The centerpiece of the app is the customizable greeting card. Start by creating a ZStack to display:
- A background image for the card.
- The recipient’s name and message on top.
Here’s the code:
ZStack {
    // Card Background
    Image(backgroundTheme)
        .resizable()
        .aspectRatio(contentMode: .fit)
        .overlay {
            RoundedRectangle(cornerRadius: 8)
                .fill(Color.white)
                .opacity(0.4)
        }
        .clipShape(RoundedRectangle(cornerRadius: 8))
        .frame(width: 350, height: 300)
        .padding(.horizontal)

    // Card Text
    Text("\(message) \(recipientName)")
        .font(.title)
        .foregroundStyle(.black)
        .shadow(radius: 20)
        .padding()
}
This code dynamically updates the background image and text as the user inputs new details.
Step 2: Adding User Inputs
Recipient Name Field
To personalize the card, add a TextField for the recipient’s name:
TextField("Recipient Name", text: $recipientName)
    .textFieldStyle(RoundedBorderTextFieldStyle())
    .padding()
    .shadow(radius: 20)
Message Field
Similarly, add another TextField for the greeting message:
TextField("Enter your message", text: $message)
    .textFieldStyle(RoundedBorderTextFieldStyle())
    .padding()
    .shadow(radius: 20)
These fields allow users to input a name and a custom message, which will immediately update on the card.
Step 3: Switching Card Backgrounds
Let’s give users the ability to select a card background. We’ll create a VStack with buttons representing different card themes:
VStack {
    Text("Pick your greeting card background")
        .font(.headline)
        .foregroundStyle(.white)

    HStack(spacing: 20) {
        Button {
            backgroundTheme = "card-1"
        } label: {
            cardModifier(cardName: "card-1")
        }

        Button {
            backgroundTheme = "card-2"
        } label: {
            cardModifier(cardName: "card-2")
        }
    }

    HStack(spacing: 20) {
        Button {
            backgroundTheme = "card-3"
        } label: {
            cardModifier(cardName: "card-3")
        }

        Button {
            backgroundTheme = "card-4"
        } label: {
            cardModifier(cardName: "card-4")
        }
    }
}
Each button calls a simple function to update the backgroundTheme variable, instantly changing the card background.
Reusable Background Thumbnail
For the buttons, we use a reusable cardModifier view to display scaled-down previews of the card backgrounds:
struct cardModifier: View {
    var cardName = ""

    var body: some View {
        Image(cardName)
            .resizable()
            .frame(width: 150, height: 150)
            .clipShape(RoundedRectangle(cornerRadius: 8))
    }
}
Step 4: Add a Festive Background
Let’s complete the app by adding a festive background that spans the entire screen. Wrap the VStack with a ZStack:
.background(
    ZStack {
        Image("candybg")
            .resizable()
            .opacity(0.6) // Subtle texture
        Rectangle()
            .fill(.black)
            .opacity(0.2) // Dim overlay
    }
    .ignoresSafeArea()
)
Add a holiday-themed image (e.g., candy canes or snowflakes) to your project’s assets and name it "candybg". This background enhances the app’s visual appeal.
The Complete Code
Here’s the entire app, ready to run:
import SwiftUI

struct ContentView: View {
    @State private var recipientName = ""
    @State private var message = ""
    @State private var backgroundTheme = "card-1"

    var body: some View {
        VStack {
            ZStack {
                // Show card background
                Image(backgroundTheme)
                    .resizable()
                    .aspectRatio(contentMode: .fit)
                    .overlay {
                        RoundedRectangle(cornerRadius: 8)
                            .fill(Color.white)
                            .opacity(0.4)
                    }
                    .clipShape(RoundedRectangle(cornerRadius: 8))
                    .frame(width: 350, height: 300)
                    .padding(.horizontal)

                // Display message
                Text("\(message) \(recipientName)")
                    .font(.title)
                    .foregroundStyle(.black)
                    .shadow(radius: 20)
                    .padding()
            }

            Spacer()

            // Input fields
            TextField("Recipient Name", text: $recipientName)
                .textFieldStyle(RoundedBorderTextFieldStyle())
                .padding()
                .shadow(radius: 20)

            TextField("Enter your message", text: $message)
                .textFieldStyle(RoundedBorderTextFieldStyle())
                .padding()
                .shadow(radius: 20)

            // Background selection
            VStack {
                Text("Pick your greeting card background")
                    .font(.headline)
                    .foregroundStyle(.white)

                HStack(spacing: 20) {
                    Button {
                        backgroundTheme = "card-1"
                    } label: {
                        cardModifier(cardName: "card-1")
                    }

                    Button {
                        backgroundTheme = "card-2"
                    } label: {
                        cardModifier(cardName: "card-2")
                    }
                }

                HStack(spacing: 20) {
                    Button {
                        backgroundTheme = "card-3"
                    } label: {
                        cardModifier(cardName: "card-3")
                    }

                    Button {
                        backgroundTheme = "card-4"
                    } label: {
                        cardModifier(cardName: "card-4")
                    }
                }
            }
        }
        .padding()
        .background(
            ZStack {
                Image("candybg")
                    .resizable()
                    .opacity(0.6)
                Rectangle()
                    .fill(.black)
                    .opacity(0.2)
            }
            .ignoresSafeArea()
        )
    }
}

struct cardModifier: View {
    var cardName = ""

    var body: some View {
        Image(cardName)
            .resizable()
            .frame(width: 150, height: 150)
            .clipShape(RoundedRectangle(cornerRadius: 8))
    }
}
Run Your App
- Add images (
card-1,card-2, etc., andcandybg) to your asset catalog. - Run the app in the simulator or on a device.
- Customize your greeting card and enjoy!
Enhancements to Try
- Save and Share: Allow users to export the card as an image or share it.
- Animations: Add subtle animations when switching backgrounds or updating the text.
- Themes: Add more backgrounds and let users select a font style.
With this app, you’re one step closer to spreading festive joy. Happy coding! 🎉
