I love organaziation, so why not organise the gifts too!

For the Third prompt, we have Gift Organizer. What will you create?
I’m looking forward to seeing what you come up with today.
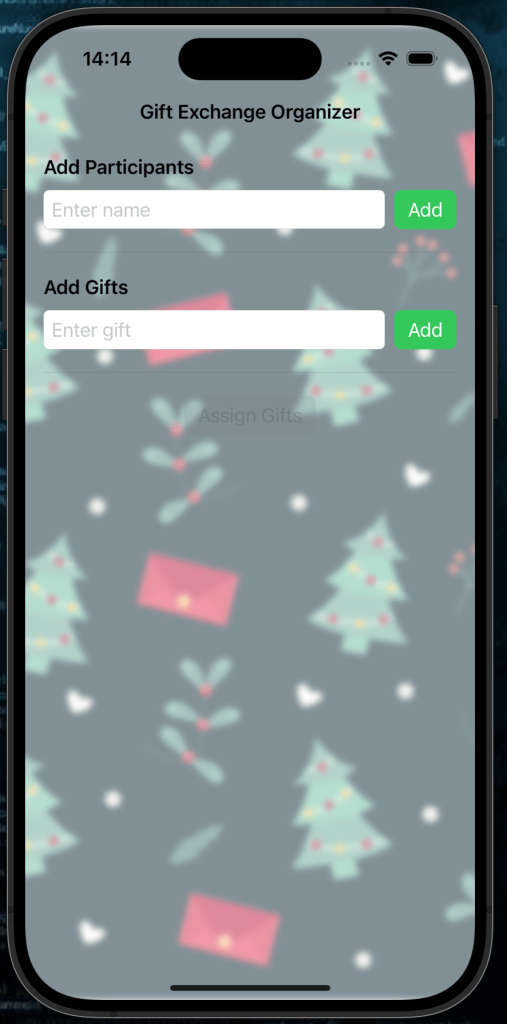
In today’s tutorial, we’ll walk through how to build a Gift Exchange Organizer app using SwiftUI. This app will allow users to add participants, assign gifts randomly, and display the assignments in a list. This is perfect for holiday gift exchanges or Secret Santa events.
By the end, you’ll have a fully functional app with:
- A sleek interface to add participants & gifts.
- A organised list with gift sharing allocations.
- Festive touches like color-coded rows and a background image.
Let’s dive in!
Getting Started
You can find the sample project in the GitHub repository here
Step 1: Setting Up the Project
Before we dive into the code, make sure you have Xcode installed. Create a new SwiftUI project and name it GiftGivingOrganizer.
Once your project is created, you can start adding the necessary UI components.
Step 2: Defining the State Variables
The app will have the following data:
- Participants: A list of names of people who are involved in the gift exchange.
- Gifts: A list of gifts that will be assigned to the participants.
- Assignments: The final list of assignments showing which participant gets which gift.
To manage these, we’ll use the @State properties in SwiftUI, which will automatically update the UI whenever the data changes.
Here’s how we define them in our ContentView:
@State private var participants: [String] = []  // List of participants
@State private var newParticipant = ""  // New participant input
@State private var gifts: [String] = []  // List of gifts
@State private var newGift = ""  // New gift input
@State private var assignments: [(String, String)] = []  // Gift assignments
In this tutorial, we will build a SwiftUI app to help organize a gift exchange. The app lets users add participants, input a list of gifts, and assign gifts randomly to each participant. Follow along to create your own app!
What Each Variable Does:
participants: Stores the list of names entered by the user.newParticipant: Holds the name currently being entered in the text field.gifts: Stores the list of gifts entered by the user.newGift: Holds the gift currently being entered in the text field.assignments: Contains the final list of participant-gift pairs after assignment.
Step 3: Create the User Interface
Now let’s add the UI components. Update the body of the ContentView:
var body: some View {
    NavigationView {
        VStack(spacing: 20) {
            // Participant Input Section
            VStack(alignment: .leading, spacing: 10) {
                Text("Add Participants")
                    .font(.headline)

                HStack {
                    TextField("Enter name", text: $newParticipant)
                       .textFieldStyle(RoundedBorderTextFieldStyle())
                    Button("Add") {
                        if !newParticipant.isEmpty {
                            participants.append(newParticipant)
                            newParticipant = ""
                        }
                    }
                    .buttonStyle(.borderedProminent)
                    .tint(Color.green)
                }
                if !participants.isEmpty {
                    Text("Participants: \(participants.joined(separator: ", "))")
                        .font(.subheadline)
                }
            }

            Divider()
Explanation of the Code:
- The
TextFieldallows users to input participant names. - The
Buttonappends the new participant to theparticipantsarray and clears the text field. - The list of participants is displayed below the input field.
Step 4: Add a Gift Input Section
Next, we create a similar UI section for entering gifts. Add this after the participant section:
           // Gift Input Section            VStack(alignment: .leading, spacing: 10) {
                Text("Add Gifts")
                    .font(.headline)
                HStack {
                    TextField("Enter gift", text: $newGift)
                       .textFieldStyle(RoundedBorderTextFieldStyle())
                    Button("Add") {
                        if !newGift.isEmpty {
                            gifts.append(newGift)
                            newGift = ""
                        }
                    }
                    .buttonStyle(.borderedProminent)
                    .tint(Color.green)
                }
                if !gifts.isEmpty {
                    Text("Gifts: \(gifts.joined(separator: ", "))")
                        .font(.subheadline)
                }
            }

            Divider()
Explanation of the Code:
- Similar to the participant section, the
TextFieldtakes the gift input, and theButtonadds it to thegiftsarray. - The current list of gifts is displayed dynamically.
Step 5: Add the Gift Assignment Button
We need a button to assign gifts randomly. Add the following code after the gift input section:
            // Assign Gifts Button            Button("Assign Gifts") {
                if participants.count > 0 && gifts.count > 0 {
                    assignGifts()
                }
            }
            .buttonStyle(.borderedProminent)
            .tint(Color.green)
            .disabled(participants.isEmpty || gifts.isEmpty)
Explanation of the Code:
- The button is disabled until both participants and gifts are added.
- When tapped, it calls the
assignGiftsfunction to randomly pair participants with gifts.
Step 6: Display the Assignments
Finally, add a List to display the results of the gift assignments. Place the following code below the button:
            // Show Assignments
            if !assignments.isEmpty {
                List(assignments, id: \.0) { (name, gift) in
                    HStack {
                        Text(name)
                        Spacer()
                        Text(gift)
                            .foregroundColor(.gray)
                    }
                    .listRowBackground(Color.yellow)
                }
                .scrollIndicators(.hidden)
                .scrollContentBackground(.hidden)
            }

            Spacer()
        }
        .padding()
        .navigationTitle("Gift Exchange Organizer")
        .navigationBarTitleDisplayMode(.inline)
Explanation of the Code:
- A
Listis used to show the participant and their assigned gift. - Each row is styled with a yellow background for better visibility.
Step 7: Add the Gift Assignment Logic
We need a function to randomly assign gifts to participants. Add this method inside the ContentView struct:
func assignGifts() {
    var remainingGifts = gifts.shuffled()
    assignments = participants.map { participant in
        let gift = remainingGifts.removeFirst()
        return (participant, gift)
    }
}
Explanation of the Code:
- The
giftsarray is shuffled to ensure randomness. - Each participant is assigned the first gift in the shuffled list, which is then removed.
Step 8: Add a Background
For a festive touch, include a blurred background image. Add this inside the NavigationView:
.background(
    Image("festive-bg")
        .resizable()
        .aspectRatio(contentMode: .fill)
        .ignoresSafeArea()
        .blur(radius: 3)
        .opacity(0.5)
)
Replace "festive-bg" with the name of your background image asset. Here is the link to the one used on the sample project. It will also be included in the sample project in the GitHub repo.
Complete Code
Here’s the full code for reference:
import SwiftUI

struct ContentView: View {
    @State private var participants: [String] = []
    @State private var newParticipant = ""
    @State private var gifts: [String] = []
    @State private var newGift = ""
    @State private var assignments: [(String, String)] = []

    var body: some View {
        NavigationView {
            VStack(spacing: 20) {
                // Participant Input Section
                VStack(alignment: .leading, spacing: 10) {
                    Text("Add Participants")
                        .font(.headline)
                    HStack {
                        TextField("Enter name", text: $newParticipant)
                       .textFieldStyle(RoundedBorderTextFieldStyle())
                        Button("Add") {
                            if !newParticipant.isEmpty {
                                participants.append(newParticipant)
                                newParticipant = ""
                            }
                        }
                        .buttonStyle(.borderedProminent)
                        .tint(Color.green)
                    }
                    if !participants.isEmpty {
                        Text("Participants: \(participants.joined(separator: ", "))")
                            .font(.subheadline)
                    }
                }

                Divider()

                // Gift Input Section
                VStack(alignment: .leading, spacing: 10) {
                    Text("Add Gifts")
                        .font(.headline)
                    HStack {
                        TextField("Enter gift", text: $newGift)
                       .textFieldStyle(RoundedBorderTextFieldStyle())
                        Button("Add") {
                            if !newGift.isEmpty {
                                gifts.append(newGift)
                                newGift = ""
                            }
                        }
                        .buttonStyle(.borderedProminent)
                        .tint(Color.green)
                    }
                    if !gifts.isEmpty {
                        Text("Gifts: \(gifts.joined(separator: ", "))")
                            .font(.subheadline)
                    }
                }

                Divider()

                // Assign Gifts Button
                Button("Assign Gifts") {
                    if participants.count > 0 && gifts.count > 0 {
                        assignGifts()
                    }
                }
                .buttonStyle(.borderedProminent)
                .tint(Color.green)
                .disabled(participants.isEmpty || gifts.isEmpty)

                // Show Assignments
                if !assignments.isEmpty {
                    List(assignments, id: \.0) { (name, gift) in
                        HStack {
                            Text(name)
                            Spacer()
                            Text(gift)
                                .foregroundColor(.gray)
                        }
                        .listRowBackground(Color.yellow)
                    }
                    .scrollIndicators(.hidden)
                    .scrollContentBackground(.hidden)
                }

                Spacer()
            }
            .padding()
            .navigationTitle("Gift Exchange Organizer")
            .navigationBarTitleDisplayMode(.inline)
            .background(
                Image("festive-bg")
                    .resizable()
                    .aspectRatio(contentMode: .fill)
                    .ignoresSafeArea()
                    .blur(radius: 3)
                    .opacity(0.5)
            )
        }
    }

    func assignGifts() {
        var remainingGifts = gifts.shuffled()
        assignments = participants.map { participant in
            let gift = remainingGifts.removeFirst()
            return (participant, gift)
        }
    }
}
Run the App
Build and run the app in the iOS Simulator. Test the following:
- Add participants and gifts.
- Assign gifts using the button.
- View the randomized assignments.
Congratulations! You’ve successfully built a Gift Exchange Organizer in SwiftUI. 🎁
Conclusion
This simple Gift Exchange Organizer app allows users to input participants and gifts, then randomly assign the gifts to participants with a simple button click. It’s a fun and useful tool for organizing Secret Santa or other holiday gift exchanges.
Feel free to customize this app with your own styling and features, such as sending invitations or managing gift lists over multiple sessions!
Further Improvements
- Persistence: You could add functionality to persist the participants and gift list using
UserDefaults, SwiftData or CoreData, so users don’t lose their data when the app restarts. - Advanced Features: Add the ability to exclude assigning a gift to the same person (in case of a Secret Santa where each person gives and receives a gift).
Happy coding! See you tomorrow.🎄
