
It’s time to decorate. Are you a lights all over the house kind of decorator or a simple small tree kind of decorator?

For the Fifth prompt, we have Decorations. What will you create?
I’m looking forward to seeing what you come up with today.
Planning your next DIY decor project? How about creating an app to help you manage and track your tasks? In this tutorial, you’ll build a DIY Decor Planner in SwiftUI. This app will allow you to:
- Add tasks to your project list.
- Mark tasks as completed or pending.
- Delete tasks you no longer need.
By the end of this tutorial, you’ll have a functional app and ideas for expanding it further.
Getting Started
1. Set Up Your Project
You can find the sample project in the GitHub repository here
Create a new SwiftUI project in Xcode:
- Open Xcode and select Create a new project.
- Choose the App template, click Next.
- Enter your project name (e.g., “DIY Decor Planner”), set the interface to SwiftUI, and click Create.
- Download your bg image here.
Step 1: Define the Task Model
First, create a simple model to represent a task:
struct Task: Identifiable {
    let id = UUID()
    var name: String
    var isCompleted: Bool
}
Explanation:
- The
Taskstruct contains:id: A unique identifier for each task.name: The name of the task.isCompleted: A boolean to track whether the task is completed.
- The
Identifiableprotocol lets SwiftUI handle lists of tasks.
Step 2: Set Up State Properties
In the ContentView, add properties to manage tasks and input:
@State private var tasks: [Task] = [] // List of tasks
@State private var newTaskName = ""  // Name of the task to be added
Explanation:
tasks: Holds all the tasks in your planner.newTaskName: Binds to theTextFieldfor entering new tasks.
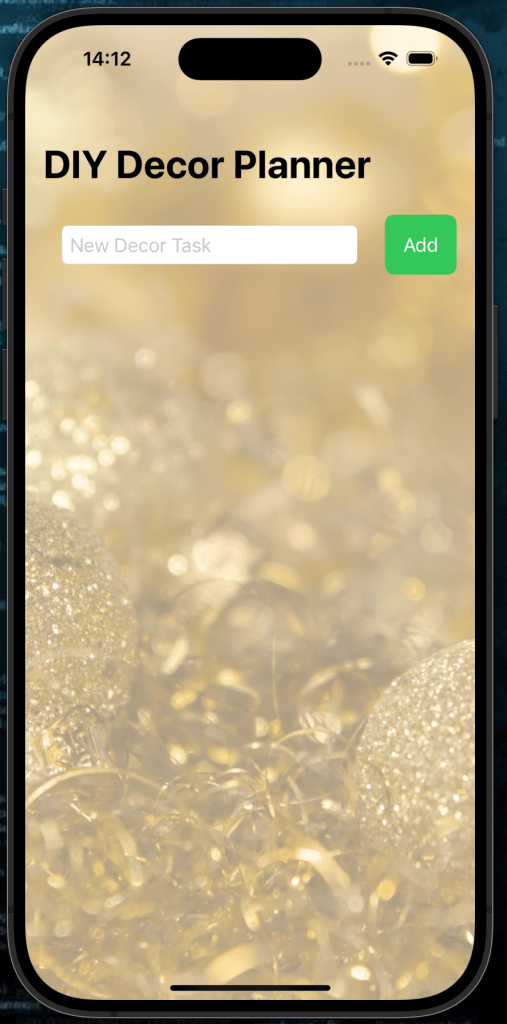
Step 3: Create the Main Layout
Wrap the interface in a NavigationView and add two main sections:
- Input Section: A
TextFieldfor adding new tasks. - Task List: A
Listto display tasks.
NavigationView {
    VStack {
        // Input Section
        HStack {
            TextField("New Decor Task", text: $newTaskName)
                .textFieldStyle(RoundedBorderTextFieldStyle())
                .padding(.horizontal)

            Button(action: addTask) {
                Text("Add")
                    .padding()
                    .background(Color.green)
                    .foregroundColor(.white)
                    .cornerRadius(8)
            }
        }
        .padding()

        // Task List
        List {
            ForEach(tasks) { task in
                HStack {
                    Text(task.name)
                        .strikethrough(task.isCompleted, color: .gray)
                        .foregroundColor(task.isCompleted ? .gray : .primary)
                    Spacer()
                    Button(action: {
                        toggleTaskCompletion(task)
                    }) {
                        Image(systemName: task.isCompleted ? "checkmark.circle.fill" : "circle")
                            .foregroundColor(task.isCompleted ? .green : .blue)
                    }
                }
            }
            .onDelete(perform: deleteTask)
            .listRowBackground(Color.white.opacity(0.5))
        }
        .scrollIndicators(.hidden)
        .scrollContentBackground(.hidden)
    }
    .navigationTitle("DIY Decor Planner")
    .background {
        Image("bg")
            .resizable()
            .aspectRatio(contentMode: .fill)
            .ignoresSafeArea()
            .opacity(0.5)
    }
}
Key Features in the Layout:
- Task Input:
- A
TextFieldallows users to enter the task name. - A button calls the
addTaskfunction to add tasks to the list.
- A
- Task List:
- A
Listdynamically displays tasks from thetasksarray. - Buttons toggle the task’s completion status using
toggleTaskCompletion. - Tasks can be deleted using SwiftUI’s
onDelete.
- A
Step 4: Add Functionality
Add Tasks
The addTask function appends a new task to the tasks array:
private func addTask() {
    guard !newTaskName.isEmpty else { return }
    tasks.append(Task(name: newTaskName, isCompleted: false))
    newTaskName = ""
}
Toggle Task Completion
This function toggles the isCompleted status of a task:
private func toggleTaskCompletion(_ task: Task) {
    if let index = tasks.firstIndex(where: { $0.id == task.id }) {
        tasks[index].isCompleted.toggle()
    }
}
Delete Tasks
The deleteTask function removes tasks by their index:
private func deleteTask(at offsets: IndexSet) {
    tasks.remove(atOffsets: offsets)
}
Step 5: Run Your App
- Run the app on the iOS Simulator or your device.
- Test the features:
- Add tasks to your planner.
- Mark tasks as completed.
- Delete tasks from the list.
Complete Code
Here’s the full code for the DIY Decor Planner:
import SwiftUI

struct Task: Identifiable {
    let id = UUID()
    var name: String
    var isCompleted: Bool
}

struct ContentView: View {

    @State private var tasks: [Task] = []
    @State private var newTaskName = ""

    var body: some View {
        NavigationView {
            VStack {
                // Input Section
                HStack {
                    TextField("New Decor Task", text: $newTaskName)
                        .textFieldStyle(RoundedBorderTextFieldStyle())
                        .padding(.horizontal)

                    Button(action: addTask) {
                        Text("Add")
                            .padding()
                            .background(Color.green)
                            .foregroundColor(.white)
                            .cornerRadius(8)
                    }
                }
                .padding()

                // Task List
                List {
                    ForEach(tasks) { task in
                        HStack {
                            Text(task.name)
                                .strikethrough(task.isCompleted, color: .gray)
                                .foregroundColor(task.isCompleted ? .gray : .primary)
                            Spacer()
                            Button(action: {
                                toggleTaskCompletion(task)
                            }) {
                                Image(systemName: task.isCompleted ? "checkmark.circle.fill" : "circle")
                                    .foregroundColor(task.isCompleted ? .green : .blue)
                            }
                        }
                    }
                    .onDelete(perform: deleteTask)
                    .listRowBackground(Color.white.opacity(0.5))
                }
                .scrollIndicators(.hidden)
                .scrollContentBackground(.hidden)
            }
            .navigationTitle("DIY Decor Planner")
            .background {
                Image("bg")
                    .resizable()
                    .aspectRatio(contentMode: .fill)
                    .ignoresSafeArea()
                    .opacity(0.5)
            }
        }
    }

    /// Add the new task to the array
    private func addTask() {
        guard !newTaskName.isEmpty else { return }
        tasks.append(Task(name: newTaskName, isCompleted: false))
        newTaskName = ""
    }

    /// Mark the particular task as completed
    private func toggleTaskCompletion(_ task: Task) {
        if let index = tasks.firstIndex(where: { $0.id == task.id }) {
            tasks[index].isCompleted.toggle()
        }
    }

    /// Delete the task from the array
    private func deleteTask(at offsets: IndexSet) {
        tasks.remove(atOffsets: offsets)
    }
}
What’s Next?
Take your DIY Decor Planner to the next level! Here are some ideas:
- Add Due Dates: Let users assign deadlines to tasks and display tasks in order of urgency.
- Task Categories: Group tasks by category (e.g., painting, crafting, shopping).
- Notifications: Send reminders for incomplete tasks.
- Cloud Sync: Use CloudKit or Firebase to sync tasks across devices.
- Custom Themes: Allow users to choose from different color schemes and background images.
🎉 Congratulations! You’ve successfully built a DIY Decor Planner in SwiftUI. Now you can organize your projects and manage tasks with ease. Happy coding, see you tomorrow!
