
How are you giving back this Christmas? Goodwill to all.

For the Tenth prompt, we have Goodwill. What will you create?
I’m looking forward to seeing what you come up with today.
Build a Charity Donation Tracker App in SwiftUI
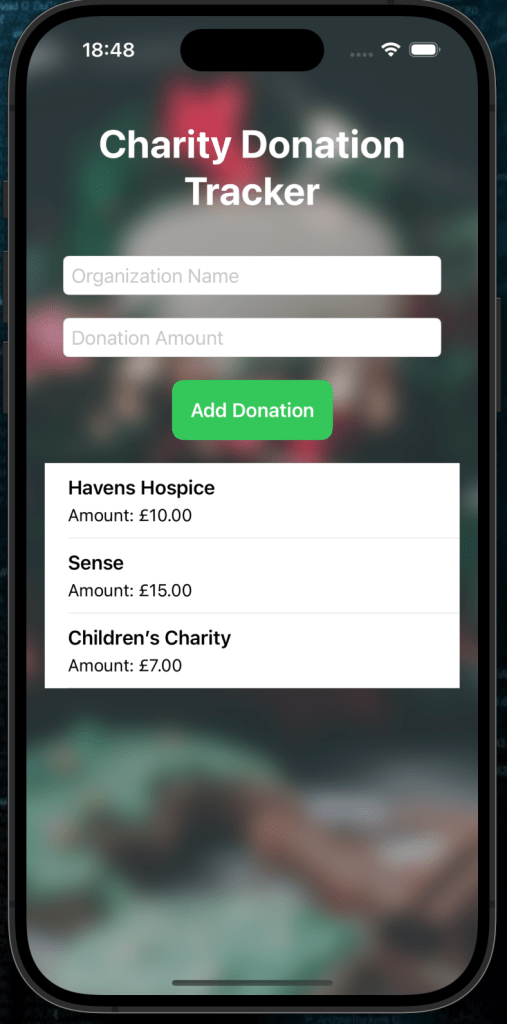
Track your donations to charitable organizations with this Charity Donation Tracker App! This simple app allows users to log donation details (organization name and amount) and display a list of all donations.
Getting Started
1. Set Up Your Project
You can find the sample project in the GitHub repository here
Here is the Background Image I used.
Create a new SwiftUI project in Xcode:
- Open Xcode and select Create a new project.
- Choose the App template, click Next.
- Enter your project name (e.g., “CharityDonationTracker”), set the interface to SwiftUI, and click Create.
What You’ll Learn
- Storing data in an array using
@State. - Using
TextFieldfor user input. - Displaying dynamic content in a
List. - Styling UI elements with buttons, text fields, and backgrounds.
Step 1: Define the Donation Model
We’ll begin by defining a Donation model to represent each donation’s details.
Code Snippet: Donation Model
struct Donation: Identifiable {
    let id = UUID()
    let organization: String
    let amount: Double
}
Explanation:
Identifiable: Conforms toIdentifiableso donations can be easily used in SwiftUI lists.- Fields:
organization: Name of the charitable organization.amount: The donation amount.
Step 2: Setting Up State Variables
We’ll use @State variables to manage the donations array and user inputs for the organization name and donation amount.
Code Snippet: State Variables
@State private var donations: [Donation] = []
@State private var organization = ""
@State private var amount = ""
Explanation:
donations: Stores the list of donations.organization: Holds the user input for the organization name.amount: Holds the user input for the donation amount.
Step 3: Adding Input Fields
We’ll use two TextFields to collect the organization name and donation amount.
Code Snippet: Input Fields
TextField("Organization Name", text: $organization)
    .textFieldStyle(RoundedBorderTextFieldStyle())
    .padding(.horizontal)

TextField("Donation Amount", text: $amount)
    .textFieldStyle(RoundedBorderTextFieldStyle())
    .keyboardType(.decimalPad)
    .padding(.horizontal)
Explanation:
- Rounded Style: Improves the appearance of the text fields.
- Keyboard Type: Sets the keyboard to numeric for the
amountfield.
Step 4: Adding a Donation
Next, we’ll add a button to validate the input and append a new donation to the list.
Code Snippet: Add Donation Button
Button {
    guard let amountValue = Double(amount), !organization.isEmpty else { return }

    let newDonation = Donation(
        organization: organization,
        amount: amountValue
    )
    donations.append(newDonation)

    // Clear input fields
    organization = ""
    amount = ""
} label: {
    Text("Add Donation")
        .font(.headline)
        .foregroundColor(.white)
        .padding()
        .background(Color.green)
        .cornerRadius(10)
}
Explanation:
- Validation:
- Ensures the
amountis a valid number. - Checks that
organizationis not empty.
- Add to List:
- Creates a new
Donationobject and appends it to thedonationsarray.
- Clear Inputs: Resets the input fields after adding a donation.
Step 5: Displaying the Donation List
We’ll use a List to display all recorded donations.
Code Snippet: Donation List
List(donations) { donation in
    VStack(alignment: .leading, spacing: 5) {
        Text(donation.organization)
            .font(.headline)
        Text("Amount: £\(donation.amount, specifier: "%.2f")")
            .font(.subheadline)
    }
}
.listStyle(PlainListStyle())
.scrollContentBackground(.hidden)
.scrollIndicators(.hidden)
Explanation:
- Dynamic Content:
- Each donation is displayed as a
VStackwith the organization name and amount.
- List Styling:
PlainListStyle: Provides a clean look.- Hides scroll indicators and the default background for a sleek appearance.
Step 6: Adding a Background
Let’s give the app a stylish background to make it more visually appealing.
Code Snippet: Background Styling
.background(
    Image("bg").overlay(.black.opacity(0.2)).opacity(0.9)
        .blur(radius: 10)
)
Explanation:
- Image Overlay:
- Applies a semi-transparent black overlay on top of the background image.
- Adds a blur effect for a soft, modern look.
- Image Source:
- Replace
"bg"with the name of your background image in the asset catalog.
Step 7: Bringing It All Together
Here’s the complete code for your Charity Donation Tracker App:
import SwiftUI

struct Donation: Identifiable {
    let id = UUID()
    let organization: String
    let amount: Double
}

struct ContentView: View {

    @State private var donations: [Donation] = []
    @State private var organization = ""
    @State private var amount = ""

    var body: some View {

        VStack(spacing: 20) {
            // Header
            Text("Charity Donation Tracker")
                .font(.largeTitle)
                .multilineTextAlignment(.center)
                .fontWeight(.bold)
                .padding()
                .foregroundStyle(.white)

            // Organisation
            TextField("Organization Name", text: $organization)
                .textFieldStyle(RoundedBorderTextFieldStyle())
                .padding(.horizontal)

            // Donation
            TextField("Donation Amount", text: $amount)
                .textFieldStyle(RoundedBorderTextFieldStyle())
                .keyboardType(.decimalPad)
                .padding(.horizontal)

            // Add donation to list
            Button {
                guard let amountValue = Double(amount), !organization.isEmpty else { return }

                let newDonation = Donation(
                    organization: organization,
                    amount: amountValue
                )
                donations.append(newDonation)

                // Clear input fields
                organization = ""
                amount = ""
            } label: {
                Text("Add Donation")
                    .font(.headline)
                    .foregroundColor(.white)
                    .padding()
                    .background(Color.green)
                    .cornerRadius(10)
            }

            // Donation List
            List(donations) { donation in
                VStack(alignment: .leading, spacing: 5) {
                    Text(donation.organization)
                        .font(.headline)
                    Text("Amount: £\(donation.amount, specifier: "%.2f")")
                        .font(.subheadline)
                }
            }
            .listStyle(PlainListStyle())
            .scrollContentBackground(.hidden)
            .scrollIndicators(.hidden)
        }
        .padding()
        .background(
            Image("bg").overlay(.black.opacity(0.2)).opacity(0.9)
                .blur(radius: 10)
        )
    }
}
Step 8: Run Your App
Run the app on an iOS Simulator or device. Test the following features:
- Organization name takes a string.
- Add donation button adds the info to the list.
- The list shows the organization and the donation amount..
What’s Next?
Here are some ideas to expand your app:
- Total Donations: Add a header showing the total donation amount.
- Delete Donations: Enable users to swipe to delete donations from the list.
- Save Data: Use
UserDefaultsor a database to persist donation data across app launches. - Currency Symbol Based on Location: Automatically display the correct currency symbol (e.g.,
$for USD,£for GBP,€for EUR) by detecting the user’s region settings usingLocale.
🎉 Congratulations! You’ve built a functional Charity Donation Tracker App in SwiftUI. 🌟
