

Welcome to Day 12 of #The12DaysOfSwiftmas aka the last day of this years challenge!
Today’s prompt…
Swiftmas 2023 GitHub repo: https://github.com/thecodingsprite/Swiftmas-2023/tree/main
This is a bitter sweet app to make as it means we are coming to the end of a truly wonderful challenge. Thank you so much for joining in. It truly has been a great way to end the year! ( I can’t wait for next years challenge already)
I left this prompt open to interpretation. I wanted to give back to all of you with a little gift message & a lot of UI tweaking but I am so interested to see what you all come up with!
My idea was to somehow have a gift that the user could open & out pops an affirmation type text. That along with a a lot of sparkles wherever I could think of. (My family will only too well know I love adding sparkles to every gift ha ha ha ha)
To enable me to pull this off, I had to think about the assets I would need before hand. I thought about a video playing but that wasn’t programatically what I was looking for so again I headed over to Canva to go looking for assets. I wanted a closed gift box & an open gift box that matched…that was by no means an easy task! I got as close as I could get & found a lovely background on Pixabay. (these assets are all available via the GitHub repo)
Now it’s time to build that UI. Again starting with the basic design, we will add the animation after along with the second view. The background image was again placed within a .background() modifier attached to that ZStack. This allows us to use the aspect ratio of .fill without effecting the child elements of the ZStack.
import SwiftUI
struct ContentView: View {
var body: some View {
ZStack {
VStack {
Spacer()
ZStack {
RoundedRectangle(cornerRadius: 15)
.frame(width: 250, height: 50)
.foregroundStyle(.yellow)
.opacity(0.5)
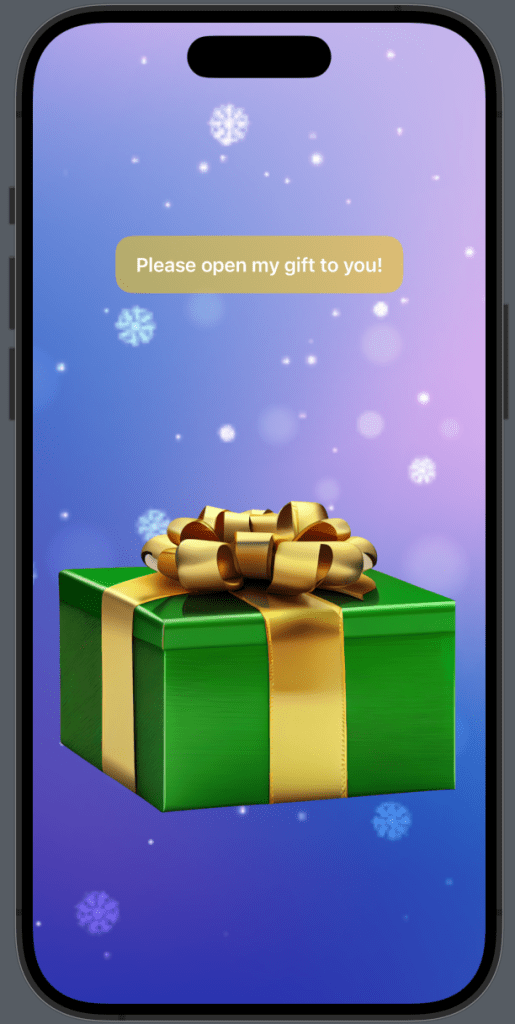
Text("Please open my gift to you!")
.font(.headline)
.foregroundStyle(.white)
}
.padding(.bottom, 60)
Spacer()
Image("gift-closed")
.resizable()
.aspectRatio(contentMode: .fit)
Spacer()
}
.padding()
}
.frame(maxWidth: .infinity, maxHeight: .infinity)
.background(Image("bg")
.resizable()
.aspectRatio(contentMode: .fill)
.ignoresSafeArea())
}Now before I worry about the animation logistics, let’s get the second view laid out too. We can place this inside our ContentView for now, I will move it into its separate file when we refactor & tidy our code up. But first things first, we will need @State property that we can use to toggle that view.
@State var isOpen = falseNow the design of the second view. I moved the open gift view to the top of the code (still within the ZStack) & wrapped it inside an if statement checking for when that @State changes. We can then place the closed gift view within the else statement. I also added a .transition modifier to the end of each element for the animation. Hoping that adding a withAnimation{} block to change the @State in the next part would be enough.
// Open the gift
if isOpen {
VStack {
Spacer()
// Affirmation
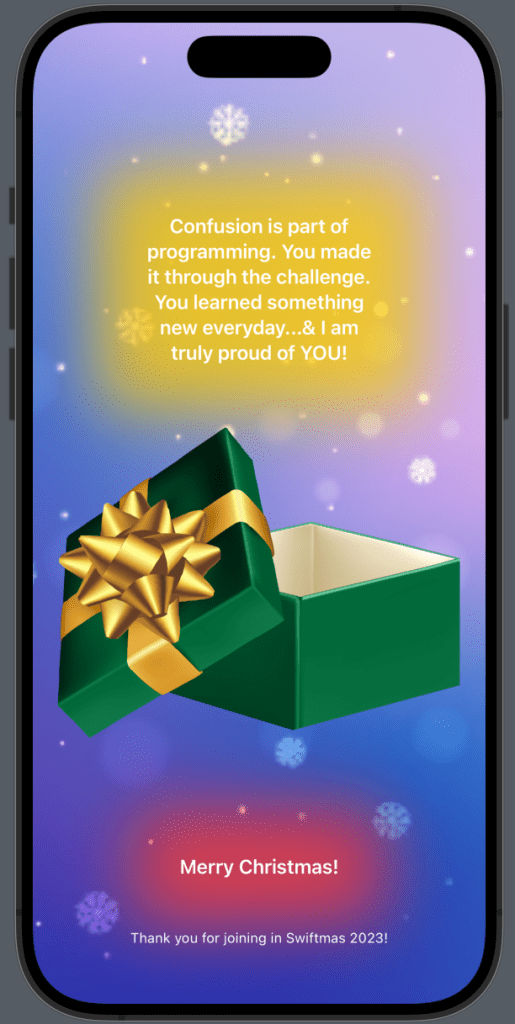
Text("Confusion is part of programming. You made it through the challenge. You learned something new everyday...& I am truly proud of YOU!")
.frame(width: 200)
.padding(40)
.bold()
.foregroundStyle(.white)
.multilineTextAlignment(.center)
.background(
RoundedRectangle(cornerRadius: 15)
.fill(.yellow)
.blur(radius: 30.0)
.opacity(0.8)
)
.transition(.opacity)
Image("gift-open")
.resizable()
.aspectRatio(contentMode: .fit)
//.padding(.top, 250)
.transition(.opacity)
Spacer()
Text("Merry Christmas!")
.padding(40)
.bold()
.foregroundStyle(.white)
.background(
RoundedRectangle(cornerRadius: 15)
.fill(.red)
.blur(radius: 30.0)
.opacity(0.8)
)
Text("Thank you for joining in Swiftmas 2023!")
.font(.caption)
.foregroundStyle(.white)
.multilineTextAlignment(.center)
}
.padding()
} else {
// Closed giftNow to adjust the closed gift view & turn that gift image into a button that changes the @State property withAnimation{}. No changes to the contents of the inner ZStack so that has been collapsed to avoid any confusion for you.
// Closed gift
                VStack {
                    Spacer()
                    ZStack {...} .padding(.bottom, 60)

                    Spacer()

                    Button {
                        withAnimation(.default .speed(0.8)) {
                            isOpen = true
                        }
                    } label: {
                        Image("gift-closed")
                            .resizable()
                        .aspectRatio(contentMode: .fit)}

                    Spacer()
                }
                .padding()

            }
This would be where I started to look at animation & why it never seems to work, but to my surprise the default animation from wrapping the @State change in a withAnimation{} was really nice along with those transitions we used on the elements. All it needed was that .speed() adjusted which is why I included it above instead of separately. I was happy enough with that as the animation effect, it was nice & smooth. So onwards to the tidy up!
Easily we can see that a second view can be moved (and should be) into its own view file. I’m hoping you are getting quite used to this now. It took me a moment to get the hang of this when I first started out so I am so hopeful this practice is helping some new to iOS development.
Right-click within the file navigator > New File > SwiftUI View – I named mine GiftOpenView. The code to steal from the ContentView is everything that is contained in that if isOpen{} statement…leaving the if statement where it is. So your GiftOpenView will contain the VStack with all the properties (I collapsed the code otherwise it’s just more scrolling over repeated code).
struct GiftOpenView: View {
   var body: some View {

       // Gift Open Properties
        VStack {...}
}
Now to go back to ContentView & create that link…simples when you don’t need to pass any info through:
// Open the gift
            if isOpen {

                GiftOpenView()

            } else {

                // Closed gift
Now this is a working application in its own right…but who fancy’s challenging themselves for the last time in this year’s challenge?
Adding SystemSound to iOS App
I have already introduced you before to adding some sound to an application in Day 08 Pets At Christmas. But adding SystemSounds is a little different…also a way bit easier than a sound file as Apple have kindly allowed us access to a huge range of system sounds. If this of interest to you then I can recommend a Medium blog with Github repo by ganeshrajugalla on her use of System Sounds here. This helped me no end in finding what sound I wanted to use.
First things first we need to add an additional import statement to ContentView (this is the file we will call it in):
import AVFoundationNow I want the sound to play only when I open the gift, so I am placing this within the button that changes that @State property. Amazingly only 1 line of code is needed to play the sound. You then pass in the number of the sound you want to play. I haven’t yet found list of system sounds but if I do then I will update this post. But I personally liked 1021 for this app.
 Button {
                        // Play sound
                        AudioServicesPlaySystemSound(1021)

                        withAnimation(.default .speed(0.8)) {
                            isOpen = true
                        }
                    } label: {
                        Image("gift-closed")
With that we are complete! I can’t quite believe we have made it through all 12 days squeeee! That must mean Christmas Break is here & only 12 days left till the big day!!
Merry Christmas Everyone & Thank You Again For Joining In!
The complete functional code is at the bottom of this post.
Our Completed Application

Thank you so much for joining in with this challenge. I hope you have enjoyed each & every day as much as I have! 🧚♀️
Complete Code
ContentView
import SwiftUI
import AVFoundation


struct ContentView: View {

    @State var isOpen = false

    var body: some View {
        ZStack {

            // Open the gift
            if isOpen {

                GiftOpenView()

            } else {

                // Closed gift
                VStack {
                    Spacer()
                    ZStack {
                        RoundedRectangle(cornerRadius: 15)
                            .frame(width: 250, height: 50)
                            .foregroundStyle(.yellow)
                            .opacity(0.5)


                        Text("Please open my gift to you!")
                            .font(.headline)
                            .foregroundStyle(.white)
                    }
                    .padding(.bottom, 60)

                    Spacer()

                    Button {
                        // Play sound
                        AudioServicesPlaySystemSound(1021)

                        withAnimation(.default .speed(0.8)) {
                            isOpen = true
                        }
                    } label: {
                        Image("gift-closed")
                            .resizable()
                        .aspectRatio(contentMode: .fit)}

                    Spacer()
                }
                .padding()

            }

        }
        .frame(maxWidth: .infinity, maxHeight: .infinity)
        .background(Image("bg")
                .resizable()
                .aspectRatio(contentMode: .fill)
                .ignoresSafeArea()
        )
    }
}
GiftOpenView
import SwiftUI

struct GiftOpenView: View {
    var body: some View {
        VStack {

            Spacer()

            // Affirmation
            Text("Confusion is part of programming. You made it through the challenge. You learned something new everyday...& I am truly proud of YOU!")
                .frame(width: 200)
                .padding(40)
                .bold()
                .foregroundStyle(.white)
                .multilineTextAlignment(.center)
                .background(
                    RoundedRectangle(cornerRadius: 15)
                        .fill(.yellow)
                        .blur(radius: 30.0)
                        .opacity(0.8)
                )
                .transition(.opacity)

            Image("gift-open")
                .resizable()
                .aspectRatio(contentMode: .fit)
                //.padding(.top, 250)
                .transition(.opacity)

            Spacer()

            Text("Merry Christmas!")
                .padding(40)
                .bold()
                .foregroundStyle(.white)
                .background(
                    RoundedRectangle(cornerRadius: 15)
                        .fill(.red)
                        .blur(radius: 30.0)
                        .opacity(0.8)
                )

            Text("Thank you for joining in Swiftmas 2023!")
                .font(.caption)
                .foregroundStyle(.white)
                .multilineTextAlignment(.center)
        }
        .padding()
    }
}
Leave a comment